前言 以前想获取应用的 .ipa 文件可以从 iTunes 下载,macOS 上的 iTunes 升级成 12.7 后,无法再获得 .ipa 文件, 而iOS 9 后就不能从 iTools 之类的辅助工具中导出 .ipa 文件。
后面 Apple 官网又提供了一个 12.6.3 的链接 .ipa文件,并重签名安装到未越狱的设备上。
环境
macOS Sierra 10.12.6
越狱设备中导出 .ipa SSH 到越狱设备,使用Cycript 找到xxx.app 的位置
1
2
3
iPhone:~ root 501 714 1 0 0:00.00 ?? 0:29.04 /var/containers/Bundle/Application/41A6836F-CFC9-4DC1-8A9C-ED4DE09F9A66/WeChat.app/WeChat 0 807 805 0 0:00.00 ttys001 0:00.01 grep WeChat
找到后使用 tar 将 xxx.app 打包
1
2
3
4
5
6
7
8
9
10
11
12
iPhone:~ root iPhone:/var/containers/Bundle/Application/41A6836F-CFC9-4DC1-8A9C-ED4DE09F9A66 root WeChat.app iTunesArtwork iTunesMetadata.plist iPhone:/var/containers/Bundle/Application/41A6836F-CFC9-4DC1-8A9C-ED4DE09F9A66 root ./ ./.com.apple.mobile_container_manager.metadata.plist ./WeChat.app/ ./WeChat.app/AppIcon60x60@2x.png ... ./WeChat.app/zh_TW.lproj/network_setting.html ./iTunesArtwork ./iTunesMetadata.plist
使用 scp 发送打包文件到 mac 上
1
2
3
➜ ~ scp root@192.168.199.132:/tmp/WeChat.tar ~/Desktop/WeChat.tar root@192.168.199.132's password: WeChat.tar 100% 97MB 1.7MB/s 00:58
重签名要求可执行文件要先脱壳
1
2
3
4
5
6
7
8
9
10
11
12
13
14
15
16
17
18
19
20
21
22
23
24
25
26
27
28
29
30
31
32
// 获得沙盒地址 iPhone:~ root cy cy // 获得应用地址 iPhone:~ root 501 714 1 0 0:00.00 ?? 0:03.25 /var/containers/Bundle/Application/41A6836F-CFC9-4DC1-8A9C-ED4DE09F9A66/WeChat.app/WeChat 0 717 699 0 0:00.00 ttys000 0:00.01 grep WeChat // DYLD_INSERT_LIBRARIES=dumpdecrypted.dylib path/to/App iPhone:/var/mobile/Containers/Data/Application/E7DE74DA-2FC9-4A86-A4D7-F993A88AB225/Documents root iPhone:~/Containers/Data/Application/E7DE74DA-2FC9-4A86-A4D7-F993A88AB225/Documents mobile$ DYLD_INSERT_LIBRARIES=dumpdecrypted.dylib /var/containers/Bundle/Application/41A6836F-CFC9-4DC1-8A9C-ED4DE09F9A66/WeChat.app/WeChat mach-o decryption dumper DISCLAIMER: This tool is only meant for security research purposes, not for application crackers. [+] detected 64bit ARM binary in memory. [+] offset to cryptid found: @0x100028ca8(from 0x100028000) = ca8 [+] Found encrypted data at address 00004000 of length 56131584 bytes - type 1. [+] Opening /private/var/containers/Bundle/Application/41A6836F-CFC9-4DC1-8A9C-ED4DE09F9A66/WeChat.app/WeChat for reading. [+] Reading header [+] Detecting header type [+] Executable is a plain MACH-O image [+] Opening WeChat.decrypted for writing. [+] Copying the not encrypted start of the file [+] Dumping the decrypted data into the file [+] Copying the not encrypted remainder of the file [+] Setting the LC_ENCRYPTION_INFO->cryptid to 0 at offset ca8 [+] Closing original file [+] Closing dump file
原版的 dumpdecrypted 无法应对有 Frameworks 的情况,不过有一个分支版本dumpdecrypted 提供了解决的方法,但是还有Plugins,幸而还有一个分支提供了使用dumpdecryptd 对 .extension 文件进行脱壳(today那种小插件,用这个版本脱壳尝试不成功,找了XX助手去下载脱壳的部分),详情可参考App Extension的脱壳办法 。都能支持的版本也已经有了dumpdecrypted
分支 对 dumpdecrypted 有些部分的代码不理解
原版的 dumptofile 的函数参数是怎么来的?
Frameworks分支版本做了什么?extension 分支版本做了什么?
在这个dumpdecrypted的Frameworks 分支版本中
1
2
3
4
5
__attribute__((constructor)) static void dumpexecutable () ... _dyld_register_func_for_add_image(&image_added); }
__attribute__((constructor))根据 attribute ((constructor))用法解析GNU的文档 可知 dumpexecutable() 方法在 main 函数之前执行
_dyld_register_func_for_add_image找了 github 上的 dyld
1 2 3 4 5 6 7 8 9 10 11 12 13 14 15 16 17 18 void _dyld_register_func_for_add_image( void (*func)(const struct mach_header *mh, intptr_t vmaddr_slide)){ DYLD_LOCK_THIS_BLOCK; typedef void (*callback_t ) (const struct mach_header *mh, intptr_t vmaddr_slide) static void (*p) (callback_t func) NULL ; if (p == NULL ) _dyld_func_lookup("__dyld_register_func_for_add_image" , (void **)&p); p(func); }
dyld 会负责传递 mh 和 intptr_t 参数
1 2 3 4 typedef __darwin_intptr_t intptr_t ;typedef long __darwin_intptr_t ;
因此 intptr_t 就是 long 类型
1
2
3
4
5
static void image_added (const struct mach_header *mh, intptr_t slide) Dl_info image_info; int result = dladdr(mh, &image_info); dumptofile(image_info.dli_fname, mh); }
调用 dumptofile 函数, 在 _dyld_register_func_for_add_image 函数的注释中提到了 called when a new image is added (a bundle or a dynamic shared library) 因此可以将 framework 也一起导出。
查找 dyld 后发现在 ImageLoader.h 头文件中,有
1 typedef void (*Initializer) (int argc, const char * argv[], const char * envp[], const char * apple[], const ProgramVars* vars)
在 ImageLoaderMachO.cpp 中有如下的函数实现
1
2
3
4
5
6
7
8
9
10
11
12
13
14
15
16
17
18
19
20
21
22
23
void ImageLoaderMachO::doImageInit (const LinkContext& context) if ( fHasDashInit ) { const uint32_t cmd_count = ((macho_header*)fMachOData)->ncmds; const struct load_command * const cmds =sizeof (macho_header)]; const struct load_command * cmd = for (uint32_t i = 0 ; i < cmd_count; ++i) { switch (cmd->cmd) { case LC_ROUTINES_COMMAND: Initializer func = (Initializer)(((struct macho_routines_command*)cmd)->init_address + fSlide); if ( ! this ->containsAddress((void *)func) ) { dyld::throwf("initializer function %p not in mapped image for %s\n" , func, this ->getPath()); } if ( context.verboseInit ) dyld::log ("dyld: calling -init function %p in %s\n" , func, this ->getPath()); func(context.argc, context.argv, context.envp, context.apple, &context.programVars); break ; } cmd = (const struct load_command*)(((char *)cmd)+cmd->cmdsize); } } }
根据函数命名知道这应该是给镜像做初始化的,里面 func 函数是 Initializer 类型的,通过 context 参数获取上下文信息,原版的 dumptofile 函数的参数列表为什么会是 (int argc, const char **argv, const char **envp, const char **apple, struct ProgramVars *pvars) 到这里就可知一二。
.extension 脱壳的 dumpdecrypted 版本与原版的区别主要是
1
2
3
4
5
6
... strlcpy(npath, cachePath.UTF8String, sizeof (npath)); strlcat(npath, tmp, sizeof (npath)); strlcat(npath, ".decrypted" , sizeof (npath)); strlcpy(buffer, npath, sizeof (buffer)); ...
指明将脱壳的包导出到应用沙盒的 .../Library/Caches 目录下
/Library/MobileSubstrate/DynamicLibraries/ 下的动态库会被MobileSubstrate.dylib 自动加载。
在原版的 dumpdecrypted 添加一些输出,使用 printf 时,据说在后面添加一个 \n 可以在日志中看到,但是试了似乎没效果,因此使用 NSLog 进行输出,添加
1 #import <Foundation/Foundation.h>
同时修改 Makefile 文件, 指明要链接 Foundation 框架
make && ldid 签名,发送到 /Library/MobileSubstrate/DynamicLibraries/ 配置好对应的 .plist 文件,启动,然后闪退,查看日志
1
2
3
4
5
6
7
8
9
Nov 20 09:13:29 Jasons-iPhone QQReaderUI[1237] <Notice>: MS:Notice: Injecting: com.tencent.qqreaderiphone [QQReaderUI] (1290.11) Nov 20 09:13:29 Jasons-iPhone QQReaderUI[1237] <Notice>: MS:Notice: Loading: /Library/MobileSubstrate/DynamicLibraries/dumpdecrypted.dylib Nov 20 09:13:29 Jasons-iPhone QQReaderUI[1237] <Warning>: [TEST]:rpath = /private/var/containers/Bundle/Application/E276C2C9-20FE-4450-915A-86EBE07798AC/QQReaderUI.app/QQReaderUI Nov 20 09:13:29 Jasons-iPhone QQReaderUI[1237] <Warning>: [TEST]:fd = 4 Nov 20 09:13:29 Jasons-iPhone QQReaderUI[1237] <Warning>: [TEST]:npath = QQReaderUI Nov 20 09:13:29 Jasons-iPhone QQReaderUI[1237] <Warning>: [TEST]:npath = QQReaderUI.decrypted Nov 20 09:13:29 Jasons-iPhone QQReaderUI[1237] <Warning>: [TEST]:outfd = -1 Nov 20 09:13:29 Jasons-iPhone QQReaderUI[1237] <Warning>: [TEST]:outfd = -1 Nov 20 09:13:29 Jasons-iPhone com.apple.xpc.launchd[1] (UIKitApplication:com.tencent.qqreaderiphone[0xc2a3][1237]) <Warning>: Service exited with abnormal code: 1
第一个 outfd = -1
1
2
outfd = open(npath, O_RDWR|O_CREAT|O_TRUNC, 0644 ); NSLog (@"[TEST]:outfd = %d\n" ,outfd);
尝试在当前目录下(/Library/MobileSubstrate/DynamicLibraries/),打开(创建)一个 QQReaderUI.decrypted,因为权限的问题失败了。
第二个 outfd = -1
后面 dumpdecrypted.dylib 还会判断是不是在/private/var/mobile/Applications(通过AppStore和iTunes安装的程序都在里面。),但显然不是,因此也失败了
调用 _exit(1) 闪退
找到一个比较具体的解释 ,排版不太好…
回到正题 将脱壳后的可执行文件同样的发送到 mac 上
1
2
3
4
5
6
➜ ~ scp root@192.168.199.132:/var/mobile/Containers/Data/Application/E7DE74DA-2FC9-4A86-A4D7-F993A88AB225/Documents/WeChat.decrypted ~/Desktop root@192.168.199.132's password: WeChat.decrypted 100% 68MB 444.4KB/s 02:36 ➜ ~ cd Desktop ➜ Desktop file WeChat.decrypted WeChat.decrypted: Mach-O 64-bit executable arm64
如何判断是否已脱壳 判断二进制是否被加密可以使用 otool 工具
otool - object file displaying tool
otool可以输出app的load commands,然后通过查看cryptid这个标志位来判断app是否被加密。1代表加密了,0代表被解密了
1
2
3
4
5
6
7
8
9
10
11
12
13
14
15
16
17
// 直接从手机中导出的 WeChat ➜ Wechat otool -l WeChat.app/WeChat | grep -B 2 crypt (standard input)-489- cmd LC_ENCRYPTION_INFO (standard input)-490- cmdsize 20 (standard input):491: cryptoff 16384 (standard input):492: cryptsize 46907392 (standard input):493: cryptid 1 // 脱壳后的 WeChat ➜ Wechat otool -l WeChat.decrypted | grep -B 2 crypt (standard input):1:WeChat.decrypted: -- (standard input)-489- cmd LC_ENCRYPTION_INFO (standard input)-490- cmdsize 20 (standard input):491: cryptoff 16384 (standard input):492: cryptsize 46907392 (standard input):493: cryptid 0
可以看出手机导出的只有当前架构的,而脱壳也只针对当前运行的架构,直接从 iTunes 下载的 .ipa 文件中的二进制文件大小大约是从手机导出的两倍,因为它包含了其他的架构。
了解重签名 学习一般都是从模仿开始的,看看 Xcode 是怎么签名的,创建新工程,⌘ + B 编译一下,然后查看日志
1
2
3
4
5
6
7
8
9
10
11
12
13
14
15
16
17
/// 签名 CodeSign /Users/Jason/Library/Developer/Xcode/DerivedData/JustForTest-ggxnkdgkdklojofwwsifymqzfwqo/Build/Products/Debug-iphoneos/JustForTest.app /// cd 到工程目录 cd path/to/project /// 扩展环境变量 export CODESIGN_ALLOCATE=/Applications/Xcode.app/Contents/Developer/Toolchains/XcodeDefault.xctoolchain/usr/bin/codesign_allocate export PATH="/Applications/Xcode.app/Contents/Developer/Platforms/iPhoneOS.platform/Developer/usr/bin:/Applications/Xcode.app/Contents/Developer/usr/bin:/usr/local/bin:/usr/bin:/bin:/usr/sbin:/sbin" /// 签名的身份 + 描述文件说明 Signing Identity: "iPhone Developer: 开发者名 (开发者ID)" Provisioning Profile: "iOS Team Provisioning Profile: com.coder.bk123" (c8748c6c-9d07-41ce-8d55-ff5ca9999999) // 使用 codesign 执行签名操作 /usr/bin/codesign --force --sign 签名值 --entitlements /Users/Jason/Library/Developer/Xcode/DerivedData/JustForTest-ggxnkdgkdklojofwwsifymqzfwqo/Build/Intermediates.noindex/JustForTest.build/Debug-iphoneos/JustForTest.build/JustForTest.app.xcent --timestamp=none /Users/Jason/Library/Developer/Xcode/DerivedData/JustForTest-ggxnkdgkdklojofwwsifymqzfwqo/Build/Products/Debug-iphoneos/JustForTest.app
--force强制代替已存在的签名
--timestamp时间戳
--sign1 2 3 -s, --sign identity Sign the code at the path(s) given using this identity. See SIGNING IDENTI- TIES below.
详情可使用 man codesign 查看
打开钥匙串应用,找到开发者证书,因为我是Debug状态下运行的,所以看开发证书,sign 的值就是指纹中的 SHA1 签名,20个16进制 正好是40位
--entitlements参数值对应的 xxx.app.xcent 文件内容如下
1 2 3 4 5 6 7 8 9 10 11 12 13 14 15 16 <?xml version="1.0" encoding="UTF-8"?> <!DOCTYPE plist PUBLIC "-//Apple//DTD PLIST 1.0//EN" "http://www.apple.com/DTDs/PropertyList-1.0.dtd" > <plist version ="1.0" > <dict > <key > application-identifier</key > <string > XXXXX.包名</string > <key > com.apple.developer.team-identifier</key > <string > XXXXX</string > <key > get-task-allow</key > <true /> <key > keychain-access-groups</key > <array > <string > XXXXX.包名</string > </array > </dict > </plist >
其中 XXXXX 是发布证书中开发者的身份ID 即 com.apple.developer.team-identifier 中的字段值
在 WWDC16 Session 401 What’s New in Xcode App Signing 有如下的内容
There are three things that you need in order to sign your apps. The first thing is a signing certificate . Signing certificates establish your identity as a developer.Provisioning profiles are all about your apps, and they grant permissions. And entitlements declare support for capabilities.
signing certificate: 开发者身份是否可信Provisioning profiles: 哪些设备可安装entitlements: 有哪些能力,比如推送,应用间分享….
在新创建的工程 Product 目录下 Show in Finder 来查看 xxx.app 文件,可以发现里面包含一个 embedded.mobileprovision 文件,可以通过
1 ➜ security cms -D -i embedded.mobileprovision
结果如下:
1 2 3 4 5 6 7 8 9 10 11 12 13 14 15 16 17 18 19 20 21 22 23 24 25 26 27 28 29 30 31 32 33 34 35 36 37 38 39 40 41 42 43 44 45 46 47 48 49 50 51 52 53 54 55 56 57 58 59 60 61 62 63 64 65 <?xml version="1.0" encoding="UTF-8"?> <!DOCTYPE plist PUBLIC "-//Apple//DTD PLIST 1.0//EN" "http://www.apple.com/DTDs/PropertyList-1.0.dtd" > <plist version ="1.0" > <dict > <key > AppIDName</key > <string > Resign01</string > <key > ApplicationIdentifierPrefix</key > <array > <string > 发布时的开发者ID</string > </array > <key > CreationDate</key > <date > 2017-11-15T03:42:41Z</date > <key > Platform</key > <array > <string > iOS</string > </array > <key > DeveloperCertificates</key > <array > <data > 签名证书</data > <data > ...</data > </array > <key > Entitlements</key > <dict > <key > keychain-access-groups</key > <array > <string > 发布时的开发者ID.*</string > </array > <key > get-task-allow</key > <true /> <key > application-identifier</key > <string > 发布时的开发者ID.com.coder.Resign01</string > <key > com.apple.developer.healthkit</key > <true /> <key > com.apple.security.application-groups</key > <array > <string > group.com.coder.Resign01</string > </array > <key > com.apple.developer.team-identifier</key > <string > 发布时的开发者ID</string > <key > aps-environment</key > <string > development</string > </dict > <key > ExpirationDate</key > <date > 2018-11-15T03:42:41Z</date > <key > Name</key > <string > iOS Team Provisioning Profile: com.coder.Resign01</string > <key > ProvisionedDevices</key > <array > <string > 允许安装的设备的UDID</string > <string > ....</string > </array > <key > TeamIdentifier</key > <array > <string > 发布时的开发者ID</string > </array > <key > TeamName</key > <string > 开发者名</string > <key > TimeToLive</key > <integer > 365</integer > <key > UUID</key > <-- 描述文件 --> <string > c8748c6c-9d07-41ce-8d55-ff5ca999999</string > <key > Version</key > <integer > 1</integer > </dict > </plist >
通过 Xcode 日志的描述文件序列号在 ~/Library/MobileDevice/Provisioning Profiles/ 目录查找,然后用对比工具进行比较,发现两者是相同的,
从中可以看出,开发的情况下,签名的过程会将我们从 Apple 开发者后台下载的描述文件embedded.mobileprovision 放到包中,用于安装时的验证。
我们在 Apple 开发者后台生成证书时要求上传一个 .csr 文件,Certificate_signing_request
Before creating a CSR, the applicant first generates a key pair , keeping the private key secret . The CSR contains information identifying the applicant (such as a distinguished name in the case of an X.509 certificate) which must be signed using the applicant’s private key. The CSR also contains the public key chosen by the applicant. The CSR may be accompanied by other credentials or proofs of identity required by the certificate authority, and the certificate authority may contact the applicant for further information.
创建 .csr 文件前,会用非对称加密算法生成一对密钥,分别是公钥和私钥,私钥存放在本地,而公钥与一些表明能自身身份的信息一起用于生成 .csr 文件。
Apple 开发者后台相当于一个 CA
Trusted certificates can be used to create secure connections to a server via the Internet. A certificate is essential in order to circumvent a malicious party which happens to be on the route to a target server which acts as if it were the target. Such a scenario is commonly referred to as a man-in-the-middle attack. The client uses the CA certificate to authenticate the CA signature on the server certificate, as part of the authorizations before launching a secure connection. Usually, client software—for example, browsers—include a set of trusted CA certificates. This makes sense, as many users need to trust their client software. A malicious or compromised client can skip any security check and still fool its users into believing otherwise.
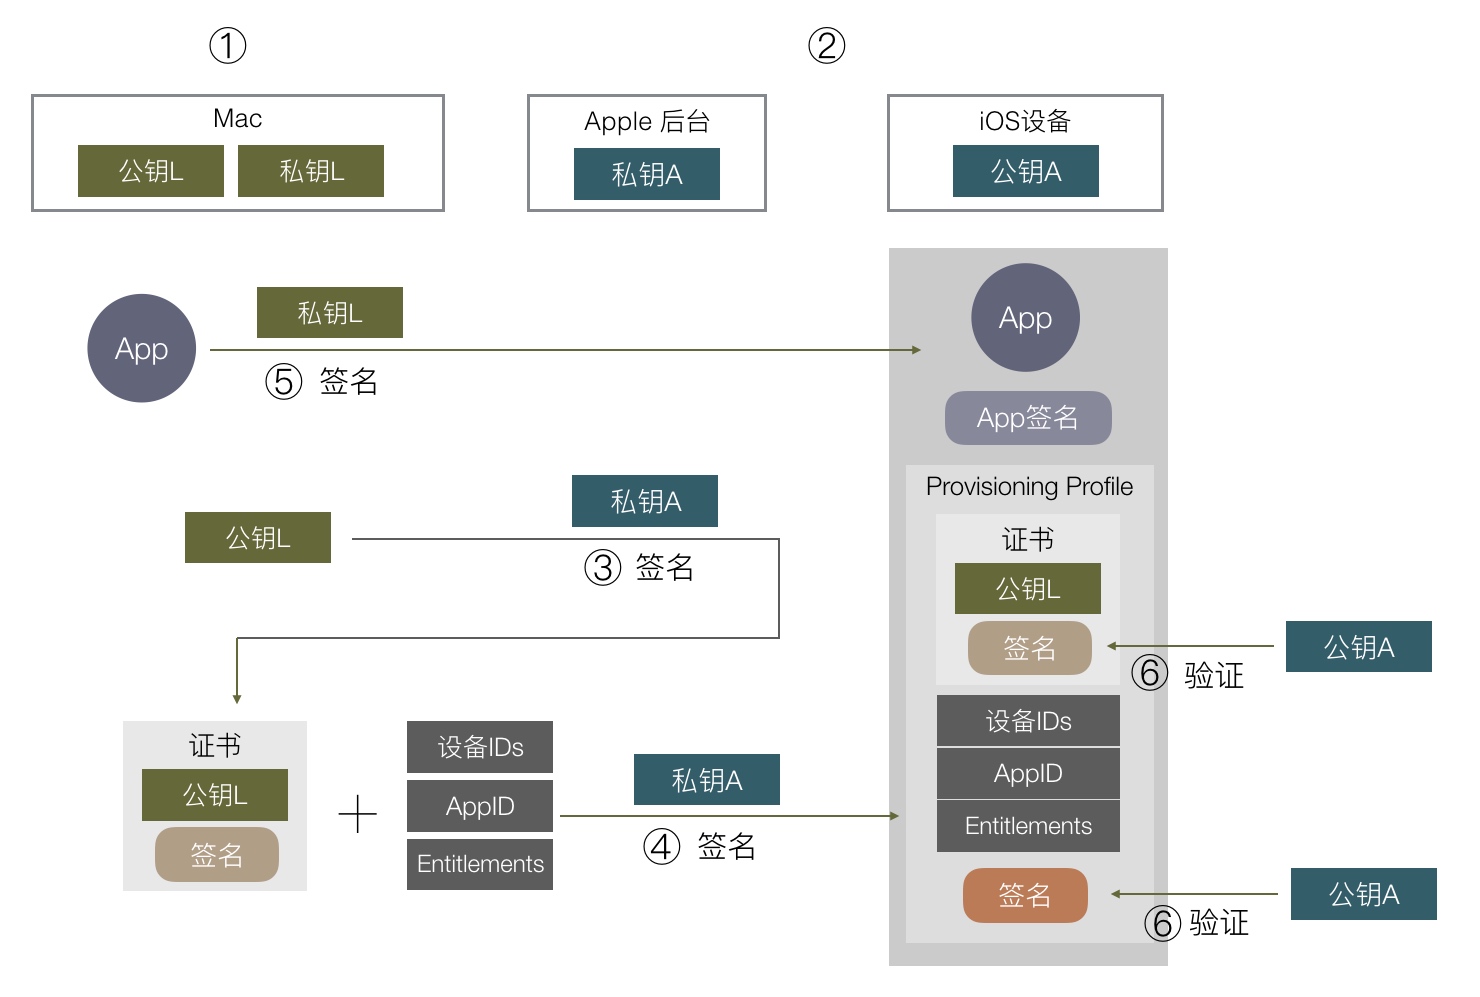
关于签名的原理,请看下图
来自-iOS App 签名的原理
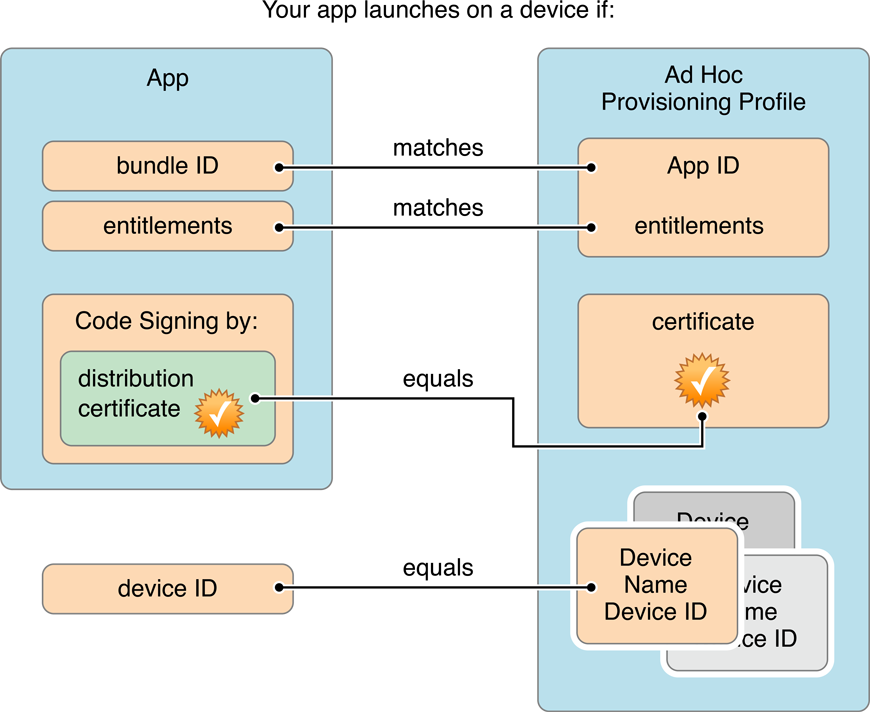
测试环境下(Ad Hoc)如何保证应用能正常运行?
来自 developer.apple.com
证书和 device ID 一般应该都不会有问题,都是从 Apple 开发者后台获取的,所以主要去考虑的是 bundle ID 和 entitlements
后面实践发现对 entitlements.plist 文件添加权限,删除权限,会影响到对应的embedded.mobileprovision,但是依然可以成功安装并运行。
看了文字的说明
The app successfully launches if the app’s bundle ID matches the App ID, the signature matches the distribution certificate, and the device is in the device list of the ad hoc provisioning profile.
只提到了 3 点,包名匹配,证书匹配(--sign 对应的证书签名embedded.mobileprovision 文件中包含的证书),描述文件的设备列表包含当前设备
哪些文件需要参与签名
Nested code , 比如 .a 静态库, .frameworks (先签名)
.ipa 包里有一个 _CodeSignature 的文件夹,其中有个 CodeResources 文件
1
2
3
4
5
6
7
8
9
10
11
12
13
14
15
16
17
18
19
20
21
22
<?xml version="1.0" encoding="UTF-8"?> <!DOCTYPE plist PUBLIC "-//Apple//DTD PLIST 1.0//EN" "http://www.apple.com/DTDs/PropertyList-1.0.dtd" > <plist version ="1.0" > <dict > <key > files</key > <dict > ... </dict > <key > files2</key > <dict > ... </dict > <key > rules</key > <dict > ... </dict > <key > rules2</key > <dict > ... </dict > </dict > </plist >
rules 和 files 是为老版本准备的,而 files2 和 rules2是为新的第二版的代码签名准备的。最主要的区别是在新版本中你无法再将某些资源文件排除在代码签名之外。+
参考的那篇文章的链接挂了…
https://xiuchundao.me/post/code-resources-and-embedded-mobileprovision-included-in-ipa-file
Mach-O executables. … To apply the signature, the codesign utility adds the signature directly to the executable file.
可以知道二进制文件的签名确实是直接在文件中的
总结
签名工具: codesign,需要提供 证书的SHA1签名值 和 entitlements.plist
embedded.mobileprovision 就是从 Apple 开发者后台下载的描述文件, 同时在编译时会被拷贝到包中重签名的应用要成功运行要保证包名匹配,证书匹配(--sign 对应的证书签名embedded.mobileprovision 文件中包含的证书),描述文件的设备列表包含当前设备
参与签名的有内嵌的框架,资源文件,二进制可执行文件
参考