内容概要
远程推送的原理
A remote notification, also called a push notification, arrives from outside the device. It originates on a remote server that you manage—the app’s notification provider—and is pushed to your app on a user’s device via the Apple Push Notification service (APNs).
远程推送是基于APNs(苹果推送服务)
问题
① APNs为什么能远程推送?
② APNs怎么知道要推送给哪个设备的哪个应用?
APNs uses a persistent IP connection for implementing remote notifications.
Apple Push Notification service (APNs) propagates remote notifications to devices having apps registered to receive those notifications. Each app on a device establishes an accredited and encrypted IP connection with the service and receives notifications over this persistent connection.
With a TLS connection established between the device and APNs, APNs can then provide an app-specific device token to each app that registers for remote notifications.
答案
① 存在一个长连接
② 设备上的每个app都可建立一个加密的许可ip用于连接与接收远程推送(deviceToken)
原理图
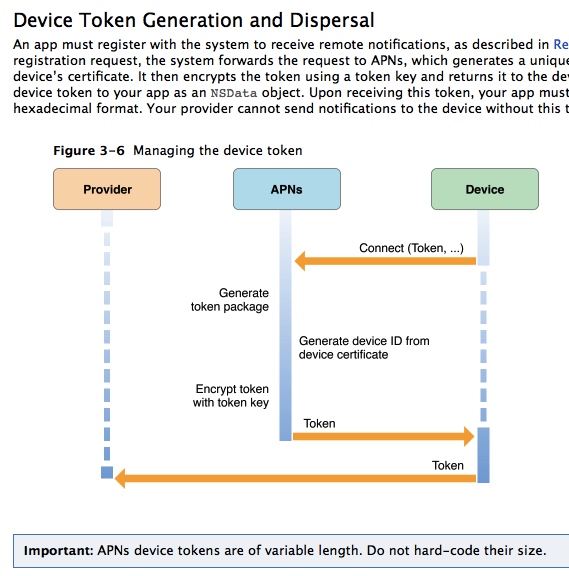
更详细的步骤(来自互联网)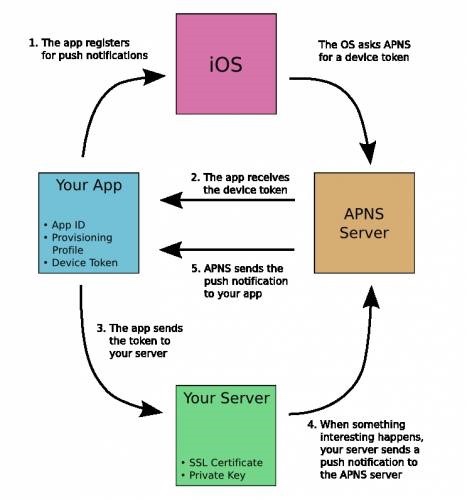
设备上的应用连接APNs服务器
APNs服务器接收到请求生成deviceToken加密后返回给设备
设备上应用获得deviceToken后上报给应用服务器
应用服务器调用APNs的API并发送 deviceToken(Each notification that your provider sends to APNs must include the device token)
APNs服务器根据deviceToken将消息推送给指定设备的具体应用
Device tokens can change after updating the operating system, and always change when a device’s data and settings are erased
deviceToken在更新系统和重新安装(先删除)会被更新
远程推送证书格式及其转换
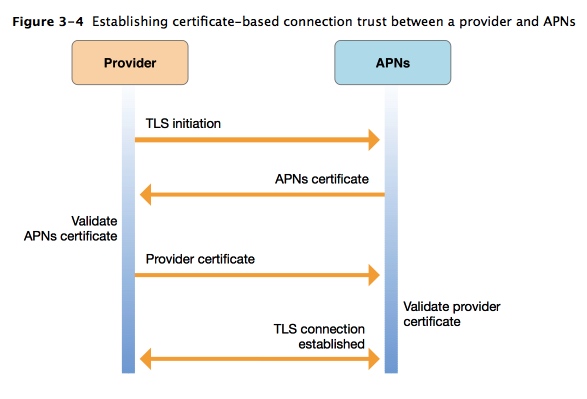
从上图可知应用服务器与APNs会有一个TLS认证,
在申请证书时,提到了使用CSR获得SSL证书,我们先来了解其他一些相关的概念
SSL/TLS
传输层安全协议(英语:Transport Layer Security,缩写:TLS),及其前身安全套接层(Secure Sockets Layer,缩写:SSL)是一种安全协议,目的是為网络通信,提供安全及数据完整性保障。
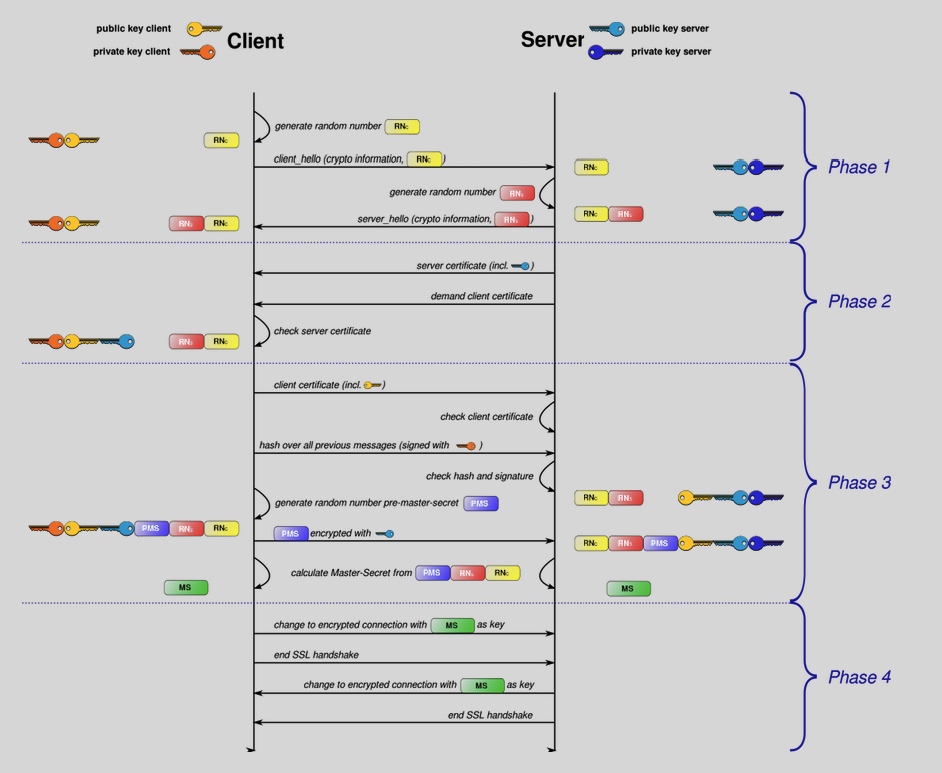
1.协商加密协议
- 1.1 客户端生成随机数RNc发送client_hello,包含客户端支持的协议,支持的压缩算法等
- 1.2 服务器接收到client_hello,并随机生成一个RNs,发送server_hello,包含服务器支持的协议,支持的压缩算法等(如果浏览器与服务器支持的版本不一致,服务器关闭加密通信)
- 1.3 客户端收到RNs,准备进入证书交换阶段
2.证书交换
- 2.1 服务器发送公钥,并要求客户端返回其公钥
- 2.2 客户端收到服务器的公钥,并检查其证书的有效性,颁发证书的机构是否合法,证书中包含的网站地址是否与正在访问的地址一致等
- 2.3 客户端验证证书合法后将发送自己的公钥,并hash处理以前的消息,最后用私钥签名加密发送给服务器
- 2.4 服务器使用客户端的公钥解密并采用相同的hash算法验证
- 2.5 客户端生成随机PMS(pre-master-secrect:一个用在对称加密密钥产生中的46位元組的乱数字),并用服务器的公钥加密发送给服务器
- 2.6 双方各自使用MS,RNc,RNs去创建一个MS作为主密钥
3.对称密钥的数据传输保密
- 3.1 客户端通知服务器使用MS做key加密
- 3.2 服务器通知客户端使用MS做key加密
结果可能使用Diffie-Hellman交换,或简化的公钥加密,双方各自用私钥解密。所有其他关键数据均使用MS加密
Wiki 在了解SSL的过程中,我们又碰到了RSA,X509等概念,下面依次解释
RSA
RSA加密算法是现在世界上运用最广泛的非对称加密算法,比如常用的https协议、银行交易等等
非对称加密算法
非对称加密算法需要两个密钥:公开密钥(publickey)和私有密钥(privatekey)。公开密钥与私有密钥是一对,如果用公开密钥对数据进行加密,只有用对应的私有密钥才能解密;如果用私有密钥对数据进行加密,那么只有用对应的公开密钥才能解密。
用途1:公钥加密
甲方生成一对密钥并将其中的一把作为公用密钥向其它方公开;得到该公用密钥的乙方使用该密钥对机密信息进行加密后再发送给甲方;甲方再用自己保存的另一把专用密钥对加密后的信息进行解密。
用途2:数字签名
另一方面,甲方可以使用乙方的公钥对机密信息进行签名后再发送给乙方;乙方再用自己的私匙对数据进行验签。
X509
一种证书标准,主要定义了证书中应该包含哪些内容 参考RFC5280 SSL使用的就是这种证书标准,该标准有两种编码格式(PEM和DER)
PEM
PEM - Privacy Enhanced Mail,打开看文本格式,以”—–BEGIN…”开头, “—–END…”结尾,内容是BASE64编码.
查看PEM格式证书的信息:openssl x509 -in certificate.pem -text -noout
Apache和*NIX服务器偏向于使用这种编码格式.
DER
DER - Distinguished Encoding Rules,打开看是二进制格式,不可读.
查看DER格式证书的信息:openssl x509 -in certificate.der -inform der -text -noout
Java和Windows服务器偏向于使用这种编码格式.
让我们重新理解证书申请的过程(数字证书)
1.从钥匙串中导出CSR文件,包含公钥及其他一些信息,Apple开发者中心进行签名后,生成.cer文件,这是一个数字证书的签名过程
2.在导出CSR文件时,除了公钥上传给Apple开发者中心,钥匙串中还存在私钥,在双击时,通过私钥去匹配签名证书中的公钥,一个数字证书的签名与验签就完成了
.p12
Personal Information Exchange Syntax Standard
See RFC 7292. Defines a file format commonly used to store private keys with accompanying public key certificates, protected with a password-based symmetric key. PFX is a predecessor to PKCS #12.
This container format can contain multiple embedded objects, such as multiple certificates. Usually protected/encrypted with a password. Usable as a format for the Java key store and to establish client authentication certificates in Mozilla Firefox. Usable by Apache Tomcat.
从中可以获知p12文件(个人信息交换标准),包含了私钥和与之相关的公钥证书,有密码作保护
从钥匙串中将.p12文件导出并上传到极光服务器,因为证书的颁发机构就是Apple,在检测证书是否合法当然没有问题,自然也可以与Apple的APNs服务器建立TLS通信
.pem
多用于*NIX服务器
.cer, .crt, .der – usually in binary DER form这些后缀名的文件一般格式都为DER
从Apple开发者中心下载的证书就是.cer格式的
.pem与.cer/.crt的不同就是它是用base64编码来表示的,而那两个都是用DER格式编码的
验证
.cer文件
1 | $ openssl x509 -in aps-3.cer -inform der -text -noout |
证明从Apple开发者中心下载的推送证书是用X.509中的DER格式编码的
格式转换
PEM–p12(PEM–PKCS#12)
1 | $ openssl pkcs12 -export -out Cert.p12 -in Cert.pem -inkey key.pem |
PFX/p12–CER/DER(PKCS#12–CER/DER)
1 | $ openssl pkcs12 -in certificate.p12 -out certificate.cer |
CER/DER–PEM(编码DER–BASE64)
1 | $ openssl x509 -inform der -in certificate.cer -out certificate.pem |
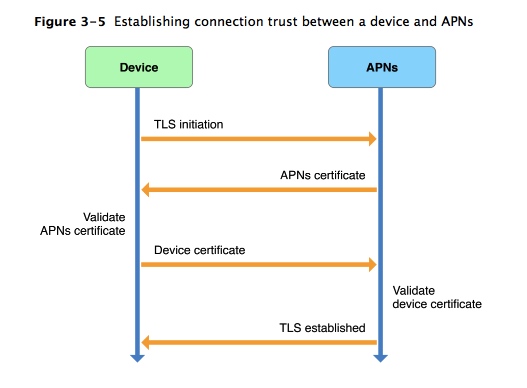
应用服务器和APNs服务器通过TLS建立信任已经说明了,顺便提一下设备和APNs服务器的信任过程
Trust between APNs and each device is established automatically by iOS upon initial device activation (and without participation by your app), as described in this section.
Each device has a cryptographic certificate and a private cryptographic key, obtained at initial device activation and stored in the device’s keychain. During activation, APNs uses the certificate and key to validate the device’s connection using peer-to-peer authentication
大体上也是APNs服务器发送公钥证书,然后系统验证证书,通过后发送设备证书,两者建立信任
证书制作
- 登陆Apple开发者中心
- 创建AppId
- 使用钥匙串导出.certSigningRequest文件
- 创建 && 下载推送证书(.cer文件)
只要有开发者账号,创建基本没什么问题,具体的截图流程可参考 极光
.certSigningRequest
A CSR or Certificate Signing request is a block of encoded text that is given to a Certificate Authority when applying for an SSL Certificate
CSR或证书签名请求是我们申请SSL证书时给予认证机构的表明身份的一段文本

实例与环境
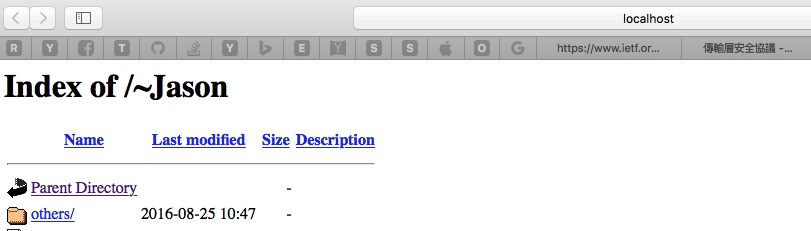
本地服务器 [参考教程]
效果图:
推送证书相关处理
- p12 钥匙串导出
- pem
- 将下载的.cer文件导出为.pem格式的文件
- 将钥匙串中的p12文件中的私钥导出为.pem格式的文件
- 合并两个文件
1 | $ openssl x509 -in 证书名字.cer -inform der -out push_distribution_cer.pem |
测试证书的有效性
1 | 生产环境 |
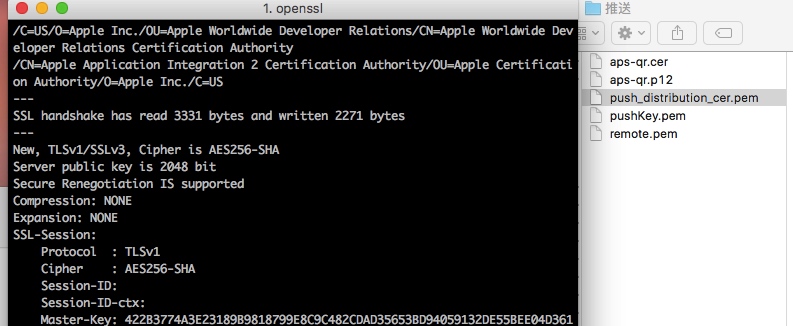
将合并后的证书文件拷贝到本地服务器的合适目录,后面会用到
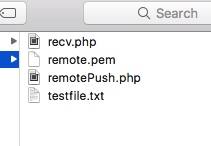
PHP
recv.php 负责接收从客户端上报的deviceToken
1 | <?php |
RemotePush.php 负责与APNs服务器交互,实现推送
1 | <?php |
iOS客户端
AppDelegate.m
import iOS10特有的UserNotification框架
1 | #ifdef NSFoundationVersionNumber_iOS_9_x_Max |
1 | - (BOOL)application:(UIApplication *)application didFinishLaunchingWithOptions:(NSDictionary *)launchOptions { |
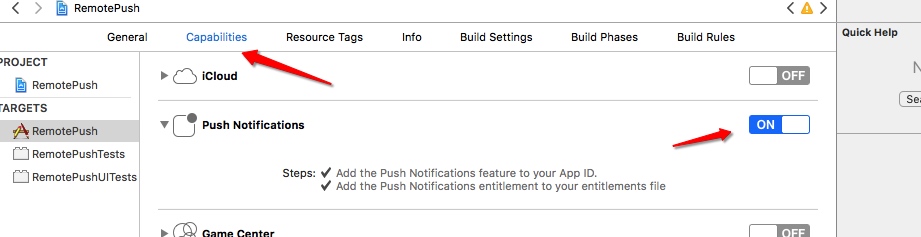
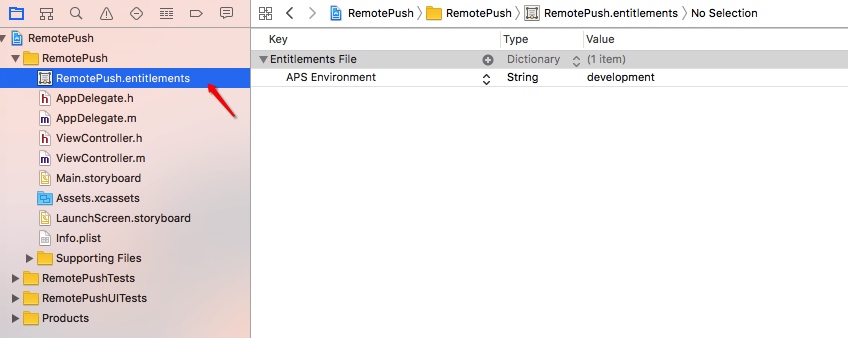
Xcode配置
推送测试
1 | Warning: stream_socket_client(): SSL operation failed with code 1. OpenSSL Error messages: |
google后发现可能是mac OS Sierra的原因
解决方案
1 | 1. 升级openssl [可选] |
终端推送
1 | $ php remotePush.php |
其他脚本
环境
macOS Sierra Version 10.12(16A323)
Version 8.0 (8A218a)
iPhone 6s 9.3.1
参考
- What is a CSR (Certificate Signing Request)?
- Wiki-PKCS
- HTTPS的工作原理
- Get Apache, MySQL, PHP and phpMyAdmin working on macOS Sierra
- 传输层安全协议
- About Local and Remote Notifications - Apple Developer
- iOS开发 iOS10推送必看
- APNs push notification with macOS Sierra
- Enabling Apple Push Notifications for ad hoc distribution environment